Speed-Zone 9:
Shasta Valley
The 110 mph territory for northern California was formed more than 300000 years ago, by a debris avalanche of Mount Shasta. In comparison to the eruption of Mount St. Helens in 1980, it has transported at least 10 times the debris, and covered a huge area. Shasta Valley is rather flat, with hummocks here and there. These hummocks are the bigger pieces of the Pleistocene-age Mount Shasta's cone. Today, the valley is covered by farms and ranches. It is easy terrain and allows a straight alignment. The main obstacles are creeks, and back in 1887, when the railroad was built, there will have been swamps.
If curve easing is undertaken anywhere along the Shasta Route, this is the right place to begin, because Shasta Valley offers the biggest time savings per dollar spent. Highest priority should be given to a series of curves in the middle of the valley, which interrupt two fast runs. Making the whole valley one fast run would allow a major improvement in average speed.
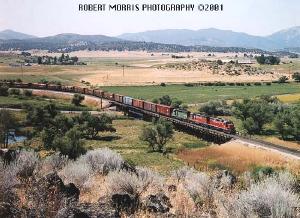
Near the Shasta River Bridge, the alignment gets curvy, bisecting the valley's straight track. One of the motivations has
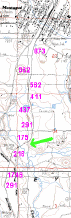
been, to keep bridges as short as possible. A green arrow marks the photo location on a map.
At both ends of the valley, there is more curvature, that could get replaced rather easily. The author suggests complete conversion to 110 mph, with the exception of 90 mph or 79 mph at either ends. With 9 inches of unbalanced superelevation, 110 mph requires a minimum curve radius of 3180 feet. 4000 feet are necessary, if using freight-friendly superelevation instead of the full height.
The following timetable does not assume any of these alignment changes. This is done in favour of consistency: For all speed zones, possible alignment changes have not been used for calculation. Instead, possible savings are noted below the table.